Learning how to cut out an image in photoshop and having issues?
You are not alone. I also had the same experience before starting to work with Photoshop. In fact, had no idea how to cut out an image in photoshop. And I can bet, many of my readers have the same experience – they do not know how to cut out an image in photoshop.
Interestingly, to cut out image or background remove using a cut out tool is simple. If you know the art, you can master the skill. If you want to cut out people or cut out pictures, you need some prior knowledge.
In this post, I have also explained to cut out background, photoshop cut out and other similar issues. Please remember, turning a cut out photoshop expert overnight is not possible. And my post also does not make that promise. Without practicing face cut out or cut out image photoshop regularly, you can’t have the skill. So, keep exploring the post. And continue practicing.
Let’s march towards the kingdom of photoshop. And learn how to cut out image in photoshop.
Step by step guide how to cut out an image in photoshop
Before moving into the core, you must check some basic elements. In this part of this tutorial, I will inform you with the basic ideas. Here they are.
Step 1- Open Adobe photoshop software to cut out image
This is the first step. You need to open the Photoshop software on your computer. However, make sure you use the premium one. Otherwise, you may not have the complete features of the software. At times, you may stumble when you see particular features are missing.

Step 2 – Open your product photography
In this phase, you have to open the photo that you want to edit. Press open from the file tab and select the photo from the location.

Step 3 – Unlock the layer
To unlock the layer, go to the lock palette. There, you will find several options. But you have to click on the locked layer – that you want to unlock. A small window will appear. You will have the option to unlock the layer. Also, you can rename it.

Step 4 – Choosing a photoshop selection tools
While using photoshop, you will a good number of tools. All of those are selection tools. Usually, they are on the left part of the screen. From the tools, you can select background eraser tool, quick mask, rectangular marquee, lasso and more. All the tools have their distinctive performance.
METHOD 1:- Photoshop clipping path technique: Pen Tool for best Pixel Perfect Selection
If you don’t know how to use background eraser, you are to apply the clipping path. It is the simplest technique. And for this execution, you are to use the pen tool. Select the tool from the tools section of your screen.
It looks like a fountain pen. You can easily recognize it. The other most important aspect is that there would be issue with the pixel. Following some other means may degrade the pixel. But here you will get a complete solution.
Step 1 through 4 are the first steps to follow.
Step 5 – Select the pen tool for cut out image

Step 6: Create a path around your subject.
Make sure your Pen tool is set to Path first.

Step 7 – Select object to using the pen tool
The very first thing is to select the object. And most of the beginners make mistakes here. Not to panic. You have to select the object using the pen tool This is a simple technique.
Step 8 – Using pen tool select object after clipping path remove the background
Now, you have to select the object through the tool. Make a clipping path. Finally, remove the background from the selection. Your task is complete.
However, you can use the photoshop background eraser for the same purpose. But the ultimate outcome won’t be up to the mark.

Advantage of erase part of an image using pen tools
Removing backgrounds from images using the pen tool in Photoshop provides an immediate and exceptional advantage to any digital artwork. As a result, pen tool users are often closer to an ideal outcome for their final project – one that is clean, crisp and expertly defined.
Not only does it give smoother edges than what could be achieved with alternative tools such as the Magic Wand Tool or Lasso Tool, pen tool users also end up with fewer missing pixels or distortion of the original image due to a greater precision – cut out features are slightly more complex in structure but benefit from being detailed and refined. In short, if you want efficient and accurate results when removing backgrounds in Photoshop, reach for the pen tool!
– Increase Image Quality.
– Easily Re-shape Objects to Perfection
– Isolate Complex Objects Seamlessly from Backgrounds.
– Create more accurate and precise cuts with the pen tool.
– Pen tool is the boss for cut out image
Get Background Cut out Service in your product image
Disadvantage of erase part of an image using pen tools
Erasing part of an image using pen tools can be quite a tricky task because it limits creativity. As you try to cut out certain parts of the image, precision is key to ensure that you are slicing out only what needs to be. If you’re not careful when cutting out your desired pieces, then you risk compromising the original shape and form of the images which could lead to unsatisfactory results.
Additionally, erasing parts of an image with pen tools take more time as compared to other methods as each line or curve needs to be carefully drafted before being deleted. All in all, although erasing part of an image with pen tools is a viable option, it can be rather challenging if one isn’t familiar or well-versed in operating this particular software program.
– Erasing a large object is time-consuming and tedious.
– If a mistake happens, the whole process need to start all over again, resulting in wasted effort or incomplete work.
– The imperfect edges left behind by erasing are visible at viewing distances which may affect the look and quality of an image overall.
Here is the related post: How do you make a dotted line with the pen tool in Photoshop
METHOD 2:- Model Image or Fur, Hair Image Cut out Background Using Quick selection tools
Step 1 – Open hair & fur images in photoshop
At first, you have to open a hair and fur image in photoshop. Most of the cases, you need to remove the background from the hair and fur. When there are hairs in the photos, you must have a background removal. The similar approach is applicable to fur images also. If there are furs in the image, it won’t look perfect unless you remove the background. So, you have to select such a photo that has either furs or hairs. It will help you to clearly get into the problem. And experience the solution that how it works.
Further Reading: Hair Transparent Background
Step 2 – Create a duplicate layer to protect the main file
Creating a duplicate layer is simple. You have to select the layer you want to duplicate. Select the name of the layer for duplication. The layer will be duplicated. Or, if you want to duplicate several layers, you have to press Ctrl and the layers

Step 3 – Start with the quick select tool
In this phase, you can start with the quick selection tool. The tool is on the left corner of your photoshop screen. Here, you will get several options. You can change the brush size, add or subtract from several other options

Step 4 – Create a high contrast background
Creating a high contrast background is easier too. You, in fact, can do this job following three simple steps. As the first step, you have to open the file (the image you want to convert into high contrast).
In the second step, you have to visit the Gradient Map. Next, go to layer option. Then, go to the New Adjustment Layer. You will find the Gradient Map. Now, use the black and white gradient. Please be noted that the black and white gradient will be set by default there. As the final step, you have to increase the contrast. You are done!

Step 5 – Create a Mask in photoshop
A mask is of great use in photoshop. Using or adding a layer mask helps you hide the layer. Also, you can show the entire layer. In the later phase, you can also hide some portions of the layer. So, based on the performance, there are two ways to create a mask in photoshop. The first one is about showing or hiding the entire layer. And the second one is about hiding a portion of the image. Here, you will get idea on both of them.
Hiding entire layer For this hiding, you have to select the entire image (or file). Ensure you have covered the image entirely. At times, there are wrong selection. If that happens, you may not have the desired result.
Now, choose the option Select. And then go to Deselect. Also, you will have the Layers panel in front of you. From the panel, you have to select the layer. To create the mask (that will reveal the entire layer), you have to click on Add Layer Mask. You will find it on the Layers panel. Then, you have to select the Layer Mask and then Reveal All option.

Step 6 – Refine with Select and Mask
Some of you might be fan of using Mask. However, using the refine edge is another impressive way to make some tweaks. It is applicable for some complex selections. Here you will get some briefs on the matter. Comparisons between Refine with Select and Mask. When you need to remove the background, Refine Edge is applicable there.
On the contrary, the Select and Mask tool is quicker. Also, it is accurate. To Refine with the Select and Mask, follow the guidelines below. For the initial selection, you have to use the selection tools in Photoshop. Then, you have to apply the Select and Mask. But if you do not press the “Shift” button, you cannot apply that. So, press the Shift button before you apply Select and Mask. Also, you can find the dialogue box of Refine Edge instead of Select and Mask. Using the dialogue box, you can fine-tune the photo edges.

Step 7 – Cut out or Remove white background photoshop the hair all around
Cut out or Remove white background photoshop the hair all aroundThe photoshop selection tool is at your service here. To cut out or remove white background photoshop.
Another important aspect is that you have to perform the job using pen tool in photoshop. Check the process below. First of all, you have to set up a layer(s) to perform this process on a white background. Remember to save your original file. Once the editing is complete, you cannot change the effects. So, you need a backup.
Now, make a high-contrast background. The process is mentioned above. Following the instructions, you can smoothly do that. In this phase, you are to remove the background. Remove it from around the hair. Now, it’s time to reduce tolerance settings. The removal of tolerance settings will remove low-contrast areas of the background. Finally, you need to remove the background.
The ways
There are several ways to perform this job. The most applicable techniques are:
- Clipping Path
- Image Masking
- Lasso
- Magic Wand
Here, you will get solid ideas on a couple of them.

Let’s check the process – the Magic Wand – how to cut out an image in photoshop
This is also known as Magic Eraser Tool. Now, select the image you want to remove white background. Then, go to the Layers panel to unlock the image. It will also make the layer as an editable one. You need to rename the layer. Or you can also make a duplicate of it.
Now, select the Magic Want tool. Based on your preference, you can adjust the Tolerance and Opacity. It’s time to erase. You have to click on the white portion on the image. Instantly, the portion will disappear. Save the image in your desired format. However, experts recommend to save the image in PNG.
Using the Clipping Path
Photoshop magic wand tool is the fastest process to select anything but not perfect. So, many experts use clipping path. The clipping path is performed using the pen tool in photoshop. So, you must use the pen tool in photoshop. Here, you will also know how to use pen tool in photoshop to cut out images.
As the first step, open the image in photoshop. From the photoshop quick selection tool, select the pen tool. Then you have to make a path layer. No worries. Whenever you make an object outline, it will open a new layer. The new layer is the path layer. Zooming into the image may help to get an accurate selection using the pen tool.
How to use pen tool in photoshop cs6?
You need to make an outline of the object in the image. Ensure you have completed making the outline perfectly. To do this, you also need to press Ctrl of your key board. And then press on the path line.
Hopefully, you can create the outline smoothly. Now, add the layer mask. From the image, the layer mask will separate the background. Here, you can also add solid color in the background (if you need). Next, get back to the Layers panel. Right click on the background layer and make a duplicate. It will protect the original file. Now, remove the white background carefully
Object Selection Tool- how to cut out an image in photoshop
Step 1 – Open product image in photoshop
Open product image in photoshop To use the object selection tool, at first you need to open the image. The image might be of any product. Or anything you want to edit.
Step 2 – Select the Object Selection tool from the Tools panel
Now, look left on the screen where you have opened photoshop. You will find some virtual tools. This is known as the Tools panel. You, in fact, will get almost all the necessary editing tools here.

Step 3 – Choose a selection mode and identify a region around the object
In this stage, you have to select any of the selection too. Now, apply the tool to select any portion of the object. It might be the lasso tool. You can use it to remove the background from the image. Or it may be the stamp tool – that helps to clone particular area on the image
Step 4 – Find out problems with the selection
Now, you have to find out the problems with the selection (if any). At times, people make the wrong selection. They cannot select the objects properly. Some of the portions of the objects remain untouched. So, the best way to skip the issues is to raise the zoom. You must increase the zoom. Make it more than 200 percent. It will help you select all the portions.

Step 5 – Hold Shift and drag to add to the selection
If you want to add something, follow this technique. You have to hold the Shift key in your keyboard. Then drag to add in the selection. The process is simple.
Step 6 – Finishing up the selection
You are almost in the last phase. Finish the selection. However, before the ending check again. If the selection is complete. Or, if any portion of the image is left to select. Not checking the selection
360 degree image editing

Step 7 – Cut out object with object selection tool
Now, use the desired tool to cut out the object. Select any appropriate tool for this purpose
How to cut out an image in photoshop with lasso tool -Make perfect with lasso tool
The lasso tool is a popular one to cut out objects. Even with less skills, you can apply it. To cut out object with lasso, check the following steps.
Step 1 – Open images in adobe photoshop
At first, open an image from your computer. Use the Adobe Photoshop to make the edit. Opening the photo in photoshop is simple. Click on the file tab and show the location where the photo is located. Automatically, photoshop will open the photo.

Step 2 – Select the Lasso tool from the Tools panel
Now, select the lasso tool from the tools panel. It is said earlier that the tools panel is located on your left on the screen. Usually, lasso tool photoshop looks like a lasso. Hence, it has got this special name.

Step 3 – Unlock the layer open the object
This time, you have to unlock the layer. By unlocking, you are opening the object. It allows you to edit the photo. Otherwise, you cannot edit it.

Step 4 – Lock the Lower Photoshop Layer
Now, lock the lower photoshop layer. Check the layer options. You will find a couple of options. And select the desired lock option. It will lock the layer and there would be no unnecessary changes.
Quick Selection Tool to Select The Object and how to cut out an image in photoshop
Next, use the quick selection tool. It will help you selecting the right tool to cut out the background. No panic. The process is simple. Go back to the earlier section of this post to know about cutting background.
Make a quick selection magic selection tools
In this phase, you will know about making a quick selection of several tools. Though the tools panel is on your left, many may not have the right ideas. They do not know which one to use. And when to use. Also, the use of quick selection tool will help you smoothen the cutting process.
How to Use the Magic Wand Tool to Make a selection?
You can use the Magic Wand tool make a selection too. To do this, you are to follow the techniques below.
Step 1 – Open image in photoshop and select magic wand tool
Click on file in photoshop. Open the image that you want to edit using the magic wand tool. Show the location of the photo, and photoshop will open the file.

Step 2 – Press a Single Click On That Area Which You Need To cut out
Now, press a single click on area you need to cut out. Under this process, you will be able to select a specific area. Later, you can cut that portion out from the image.

Step 3 – Cut out white background photoshop
Next, you have to cut out the white background photoshop. It’s an easy process as well. After selection, cut it using the tool.
Step 4 – Cancel The Selected Area
After cutting out the area, you have to cancel the selection. To cancel it, right click on the screen. You will get several options. From the options, select cancel selection. The cancellation is complete.
Step 5 – For Clean The Photo You Can Use Eraser Tool
If you want to clean the photo, also you can use the eraser tool. The eraser tools can erase the noise and unwanted elements from the photo. Select an area in the photo. Apply the tool. See, how magically the elements vanish from the image

Which Tool is Perfect to removing and cut out object
This is a very common question from the beginners. There are several photoshop tools for this job. However, the photoshop pen tool is the best one here. All the other tools have some issues with them. You may not be accurate all the time while cutting. But the pen tool photoshop provides a professional cutting. Using the pen tool, you cut any object in the photo. Want to know how to use pen tool in photoshop? Check the upper section. There, you will have guidelines for using pen tool in photoshop.
Cut out portrait image in photoshop
This is another aspect of photo editing. You can cut out portrait in photoshop. Using the ordinary techniques, this is possible. And there are several benefits as well. When you remove the background, the object gets a distinctive look. Besides, you can remove all the unwanted elements. The sole aim, in fact, is to remove the background. Therefore, you can also add any special background to the object. Or add any solid color as well.
When We Need to cut out backgrounds for photoshop
At times, we need to cut out backgrounds for photoshop. When there are unnecessary objects, we need it. Besides, some of the images have too many noise and distortion. By removing the object, we can make that look more professional. Also, when you want to create an appealing sense, you need to cut out the background. The scope of customization is easier when there is no background.
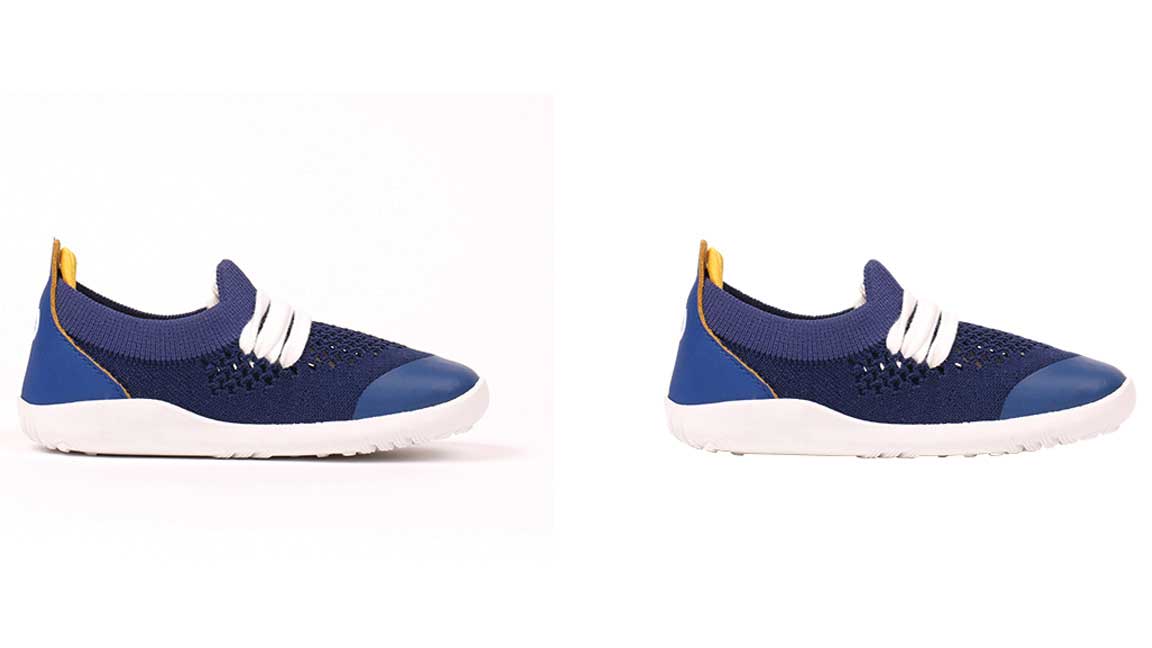
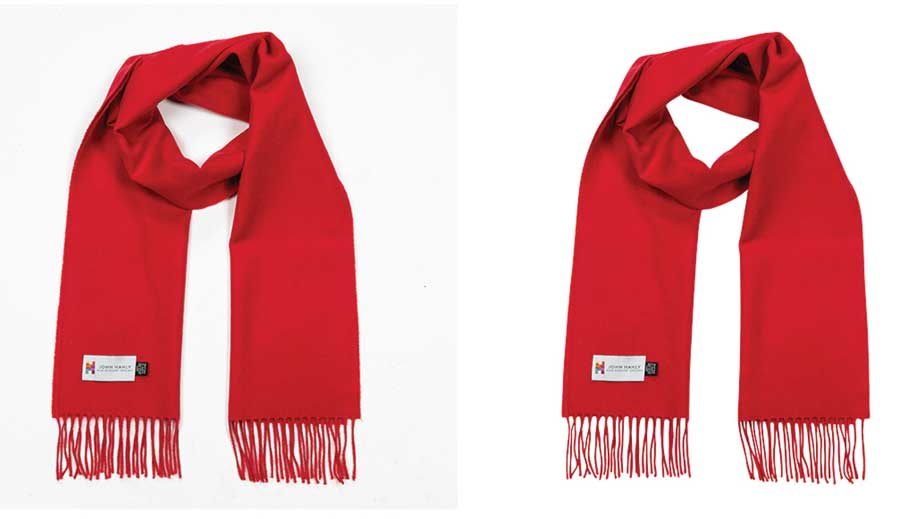
Cut out white Background For Product Photo, Ecommerce, Model, Auto parts
Alongside other object, the technique is applicable for different products. If you deal with online business, this is a must for you. You need to separate your product photo from the background. It brings a detailed and appealing look. Further, ecommerce largely relies on this service. Even the auto parts or fashion models are not exception. The fashion industry or automobile business – now a days- need the support.
Which is the best technique online tools clipping magic vs cut out image
Both the techniques are fine. They have their special features and effects. But it entirely depends on the photo editor. If the editor is comfortable with clipping magic, s/ he can apply it always. In contrary, if the photo editor is comfortable with cut out image, there are no bars in following.
Cut out photo with clipping photo experts
Clipping photo experts is one of the leading photo editing agencies. The agency arrives with numbers of attractive features and payment options.
Moreover, the photo editors here are highly skilled. They have been working in the industry for years. So, they have the right knowledge and skills. The photo editors also realize the needs of the clients. Accordingly, they deliver the projects.
Your satisfaction is guaranteed at clipping photo experts. Try us today!

Shahidul Islam
Founder & Managing Director at Clipping Photo Experts
Helping photographers, brands, and ecommerce businesses create stunning visuals through professional photo editing, image masking, retouching, and post-production services. Passionate about sharing practical Photoshop and photography insights based on real-world experience.
See Our Related Blogs