
What does it mean to clipped in photography ?
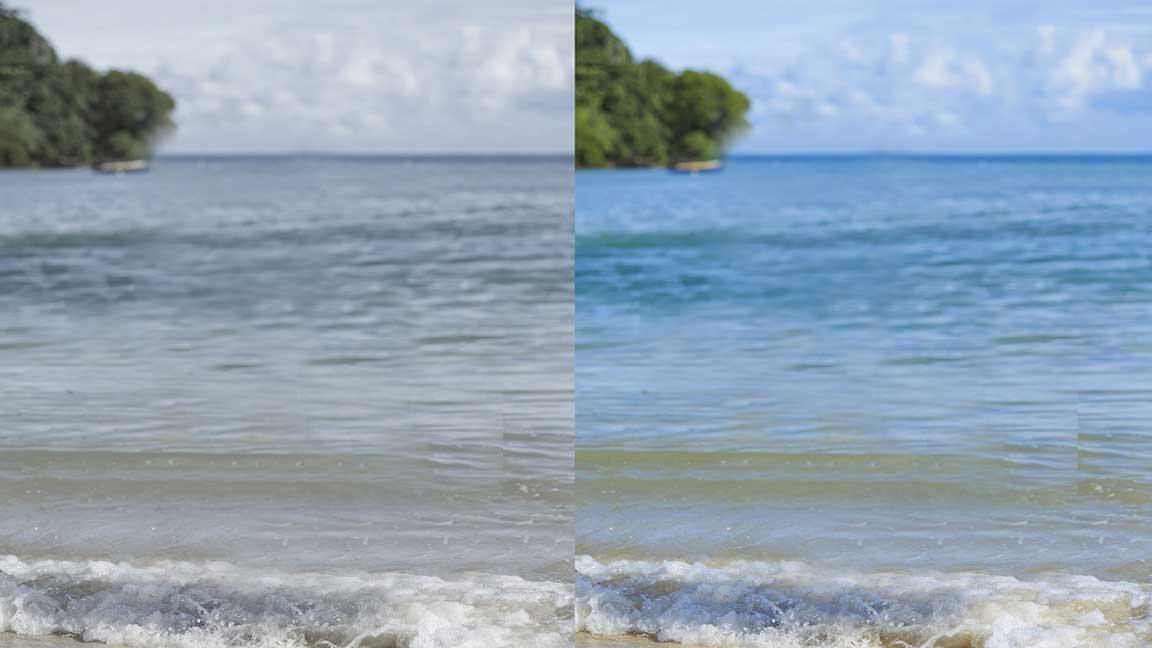
Have you ever had an issue with your photos coming out overexposed or underexposed? You may be experiencing something called clipping. In photography, clipping occurs when a photo has areas that are either too bright or too dark for the camera’s sensor to capture the detail within them accurately.
Clipping is one of the most common problems encountered by photographers and can be very frustrating when trying to capture beautiful images. From underexposed shadows that seem blocked in complete darkness to overexposed highlights that look like white blobs, clipping can ruin otherwise great shots.
Clipping can be avoided with some simple rules and good understanding of your camera’s limitations; however it is sometimes necessary to allow a small percentage of clipping as it sometimes unavoidable due to lack of light, minor camera movements etc. This article explains what is clipping, why it happens and how to avoid it in your photography using both technical and creative approaches.

When can you get clipping in your images?
Clipping is a common issue that arises when getting a photograph taken. Clipping occurs when the brightness of an image exceeds the range of values the camera can utilize, resulting in either highlights or shadows being lost due to overexposure or underexposure. Photos taken in bright settings can be particularly vulnerable to getting clipped. To avoid getting clipped in your images, one should either adjust the exposure level manually or rely on the automatic mode option with which most cameras are equipped; this will allow for a greater range of brightness levels to be captured and displayed.
1. While taking a photo
When getting ready to take a photograph it is important to ensure that you don’t get too close, otherwise known as getting clipped. In a photo, getting clipped is when the focus of what your capturing gets lost because it becomes over exposed or featureless. This can usually happen in the background of the photo and washed out details resulting in an unintelligible photograph, which defeats its purposeful definition. This can easily be avoided by stepping back before taking the picture and being mindful that getting clipped will ultimately reduce the quality of your image.
2. While editing a photo
When it comes to clipping your exposure while photo editing, the clipping point is essential. For those who are unfamiliar, clipping points indicate areas where details of the photo are typically lost due to excessive light or dark tones. If you are taking a shadow photoshoot, for example, clipping points help you identify where highlights and shadows should fall for optimal realism in the final product. An advantage of clipping points is that they can be adjusted according to desired outcome. Knowing this information can help set eyes on the most important factors in achieving a successful final photograph.
How to avoid clipping photography?
Well, you can easily avoid clipping in photography. That is, in fact, not a big deal. The image clipping path services can help you in this case. But you can also follow the measures below
- Always Shoot Raw
- Use The Correct Metering Mode
- Use Exposure Compensation
- Use the Histogram to Avoid Clipping the Highlights
- Shoot During the Golden Hour
- Use a Graduated ND Filter
- Shoot for HDR Or Do Exposure Bracketing
If you are still confused, check the explanations here

Use the Correct Metering Mode
At the same time, you need to know the metering mode. Often, there are some adjustments in metering mode. It happens when you have less knowledge of your camera. So, you better learn to operate the camera first. Next, you can use the image editing after determining the flaws. And hope that it would be easier to deal with the matter.

Shoot for HDR Or Do Exposure Bracketing
Do you know how HDR works? It selects the best photos from the bunch of pictures. And the process is automated. So, if you use the HDR or exposure bracketing, you can have the right images. Using the HDR will reduce the application of clipping mask indesign. So, you will have fewer troubles in post-production.

Shoot During the Golden Hour
Do you know the golden hour? It is a few moments later after the sunrise. Or sunset. The sunlight is a bit redder. So, there is no sharp light that can cause a distraction to your photography. Many of the professionals prefer the golden hour. It helps them to avoid clipping in their professional photography.
Use A Graduated ND Filter
Using the graduated neutral-density (ND) filter, you can bring clipping path flatness. The flatness will reduce the highlights or shadows. It, in fact, will control the transmission of light in the lens. In the end, there will be no clipping. So, you can get photos without image color correction.
Get Free Trial
I am here to help you whenever you are searching for clipping photography editing.
Always Shoot Raw
This is a unique technique. If you follow this one, you will have no issue the. Of course, there would be shadows.
You may also see some highlights. But with the raw photos, there are no such matters. When you edit the raw photos, you can easily remove the clipping.

Use the Correct Metering Mode
At the same time, you need to know the metering mode. Often, there are some maladjustments in metering mode. It happens when you have less knowledge of your camera. So, you better learn to operate the camera first. Next, you can use the image clipping path after determining the flaws. And hope that it would be easier to deal with the matter.

Use Exposure Compensation
Exposure compensation is another solution. You can avoid clipping in photos without image clipping path photoshop. When the exposure exceeds the limit, you need to readjust it. You need to check the exposure meter reading. If the reading is more, you have to adjust it. And take another shot. The process is simple, not rocket science
How to edit clipping in photography?
Clipping removal in photography is not a big deal. This is a simple process using a clipping path indesign or photoshop. In this photo editing software, you will get several options to fix clipping. Well, that is simple as well. For removing clipping photography, you will have options of highlights and shadows. By adjusting the highlights and shadows, you can remove clipping in photography. It, in fact, does not need any special skills. You are to adjust the bars and check the effects. Unless the highlights are neutral, you must keep adjusting. A similar approach applies to the shadows as well. Another way to remove photography photoshop clipping is by adjusting the curve tone. You have to change the curve tone and check the highlight or shadow level. When you find the highlight vanished, the adjustment is complete. This is the easiest way to get rid of photography clipping.
Why need to edit photography Photoshop clipping?
The saying goes that a photo is worth a thousand words. As it expresses everything in detail, the images should be perfect. There should be no excessive shadows or highlights in the pictures. Besides, there are a few other factors. Let’s check the points below.
- Professional look
- Beautification of the photos
- Photo quality enhancement
- Multi-platform usability
- Easy customization
People also Want to know this question
What is a clipping of a picture?
Ans: Clipping is an issue that plagues photographers, resulting in “blown out” parts of a photo with no detail. Highlights may appear pure white or shadows full black due to the lack of data – both creating unwanted distractions from your picture-perfect shot!
What is exposure clipping?
In photography, clipping is the result of recording highlights or shadows that are outside of the camera’s dynamic range. This can happen when the subject is too bright or too dark for the camera to properly capture, resulting in loss of detail.
How to avoided exposure clipping?
Exposure clipping can be avoided by using a low ISO setting and/or a narrow aperture, which will both help to reduce the amount of light that enters the camera. It’s also important to meter your shots carefully so that you’re not overexposing or underexposing your image. If you do end up with clipped highlights or shadows, you can try to salvage them in post-processing by using exposure blending techniques.
How do I stop my photos from clipping?
When you’re taking a photo, you want to make sure that all of the elements are in frame and that nothing is cut off. This can be a challenge, especially if you’re working with a busy background or trying to capture a wide landscape. But there are a few things you can do to avoid clipping in your photos.
First, take a step back. If you’re too close to your subject, it’s easy to end up with part of them being cut off in the frame. So back up until everything looks good in the viewfinder or on your LCD screen.
Second, zoom in instead of using a wide-angle lens. A wide-angle lens can be great for landscapes, but it can also cause problems with clipping if you’re not careful. By zooming in, you can eliminate some of the background and make it easier to keep everything in frame.
Finally, watch your edges when you’re framing up a shot. It’s easy to get so focused on what’s in the center that you forget about what’s happening at the edges of the frame. But if something is cut off at the edge of the photo, it will look odd and unfinished. So take a moment to check all four corners before you press the shutter button.
By following these tips, you can avoid clipping in your photos and get great shots every time!
What is clipping in Lightroom?
Ans: Clipping in Lightroom is a way to make sure your photos are properly exposed. When you take a photo, the camera sensor captures a certain amount of light. This light is then converted into digital information that the computer can read. The problem is that sometimes this information can be too much for the computer to handle, and it will start to lose details in the shadows or highlights. This is where clipping comes in.
What is the process of clipping?
In photography, clipping is the result of overexposing or underexposing a photo, which causes some areas of the image to become so bright or dark that all detail is lost. This results in “blown out” highlights or “clipped” shadows, which appear as blank white or black areas in the photo. To avoid clipping, it’s important to check your camera’s histogram after taking a photo. The histogram is a graph that shows you how many pixels in the image are at each brightness level. If the graph is skewed to one side or the other, it means there are areas of the image that are being clipped. There are times when you might want to intentionally clip parts of an image, such as when creating a high-contrast black and white photo. In this case, you would deliberately overexpose or underexpose the image to create more dramatic effects.
Last words
So, now you know the difference between photography clipping path and photo clipping. They are two different elements. And they have other uses. Photo clipping makes the photos look non-professional. There are highlights or shadows across the images. Or in some particular places in the images.
Using the clipping path in photography, we separate elements. But removing clipping, we bring a flatness in the images. So, clipping photography is of great use to everyone.


Recent Comments